
The Label the Skeleton Worksheet PDF is an essential educational tool designed to help students learn and identify the human skeletal system through interactive labeling exercises․
Overview of the Worksheet
The Label the Skeleton Worksheet PDF provides a comprehensive and interactive learning experience, focusing on the human skeletal system; Designed for students and educators, it features detailed diagrams of the skeleton, allowing users to identify and label major bones․ The worksheet is structured to promote visual learning, with clear illustrations and space for writing labels․ It also includes additional elements, such as fun facts and mnemonics, to enhance engagement and retention․ Perfect for anatomy classes or self-study, this resource is ideal for beginners and advanced learners alike․ Its simplicity and effectiveness make it a valuable tool for understanding the complex structure of the human skeleton․
By combining visual and hands-on learning, the worksheet ensures an immersive experience, helping users grasp anatomy concepts with ease and confidence․

Importance of Anatomy Education
Anatomy education is fundamental for understanding the structure and function of the human body, serving as the foundation for careers in medicine, healthcare, and related fields․ It fosters critical thinking, spatial reasoning, and a deeper appreciation for the complexity of life․ By studying anatomy, students gain essential skills in identifying and naming body parts, which are crucial for diagnosing and treating medical conditions․ The skeletal system, in particular, is vital for understanding movement, support, and protection mechanisms in the body․ Engaging with tools like the Label the Skeleton Worksheet PDF helps students develop these skills in an interactive and memorable way, preparing them for real-world applications in fields such as surgery, physical therapy, and forensic science․
Mastering anatomy builds a strong academic and professional foundation, enabling individuals to contribute effectively to healthcare and scientific advancements․
Understanding the Skeleton
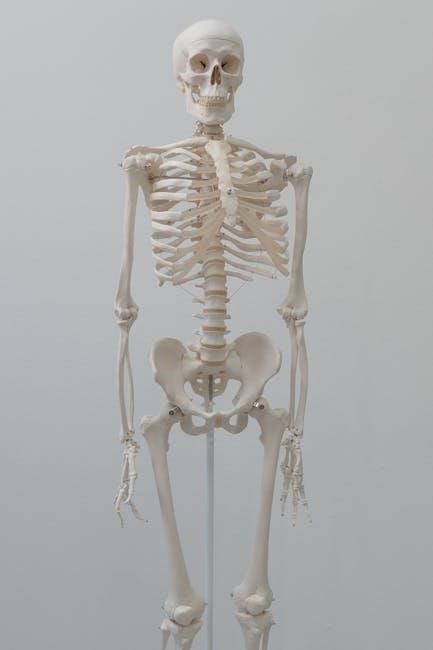
The human skeleton is a complex framework of bones that provides support, protection, and movement for the body․ It consists of 206 bones, forming a sturdy yet flexible structure essential for daily functions․ The skeleton serves as the body’s foundation, enabling activities like walking, sitting, and maintaining posture․ Understanding its composition and function is vital for appreciating human anatomy, making it a cornerstone of biological and medical studies․ Tools like the Label the Skeleton Worksheet PDF simplify learning by allowing interactive exploration of the skeletal system, helping users identify and memorize each bone’s role in the body․
Major Bones of the Human Body

The human skeleton comprises 206 bones, with several being particularly significant due to their size and function․ The cranium, facial bones, vertebrae, sternum, and ribs form the axial skeleton, protecting vital organs like the brain and heart․ The humerus, radius, ulna, carpals, metacarpals, and phalanges make up the upper limb bones, enabling arm and hand movements․ The lower limb includes the pelvis, The human body contains various types of joints that facilitate movement and provide structural support․ Hinge joints, such as the elbow and knee, allow movement in one plane, enabling actions like bending and straightening․ Ball-and-socket joints, including the shoulder and hip, offer a wide range of motion in multiple directions, essential for activities like throwing and walking․ Pivot joints, like those in the neck, permit rotational movement, while saddle joints in the hands and feet allow for nuanced movements․ Gliding joints enable limited sliding motions between bones․ Understanding these joints is vital for comprehending human mobility and skeletal function, making them a crucial focus in anatomy education and tools like the Label the Skeleton Worksheet PDF․ Start by identifying major bones, then systematically label each one, ensuring accuracy․ Use the worksheet as a guide to avoid confusion and master the skeletal system effectively․ Following these steps ensures a comprehensive understanding of the skeletal system while enhancing labeling skills effectively; When labeling the skeleton, students often make errors due to rushing or lack of attention to detail․ To avoid these mistakes, work methodically, cross-reference with learning materials, and take your time to ensure accuracy․ The Label the Skeleton Worksheet PDF enhances learning by actively engaging students in identifying and understanding human bones, reinforcing concepts through hands-on practice and clear visual guides․ Engaging with the Label the Skeleton Worksheet PDF actively involves students in their learning, which significantly enhances memory retention compared to passive methods like reading or listening․ By labeling bones, students interact directly with anatomical information, reinforcing their understanding through repetition and visual association․ This hands-on approach helps solidify concepts in long-term memory, making it easier to recall details during exams or future studies․ The worksheet also allows for self-assessment, enabling students to identify and correct mistakes, further improving retention․ Over time, repeated practice with the worksheet builds familiarity and confidence, ensuring a strong foundation in skeletal anatomy that lasts beyond the classroom․ Using the Label the Skeleton Worksheet PDF fosters a deeper connection to anatomical studies by transforming learning into an interactive and immersive experience․ Unlike passive methods like reading textbooks, labeling bones requires active participation, which captivates students’ attention and fosters curiosity․ The hands-on nature of the worksheet makes anatomy more accessible and engaging, especially for visual and kinesthetic learners․ By directly interacting with diagrams, students can better visualize the skeletal system’s structure and relationships between bones․ This engagement not only enhances focus but also increases motivation, making anatomy more enjoyable and relatable․ Over time, this interactive approach cultivates a stronger interest in the subject, encouraging students to explore anatomy beyond the classroom․ The worksheet thus serves as a powerful tool for making complex concepts more dynamic and engaging․ Ensure clarity by using high-quality diagrams and legible fonts․ Organize bones logically, and include a reference key․ Use color coding for better differentiation and accessibility․ Creating clear and visible diagrams is crucial for effective learning․ Use high-quality images of the human skeleton, ensuring Proper labeling and minimal clutter․ Choose a clean layout with adequate white space to avoid overwhelming the student․ Ensure that bones and joints are well-defined and easily distinguishable․ Use bold, legible fonts for labels, and avoid overlapping text with diagrams․ Consider color-coding different bone groups for better differentiation․ Include a legend or key to explain labels and symbols․ Maintain consistency in font sizes and styles throughout the worksheet․ High contrast between text and background improves readability․ Finally, ensure diagrams are appropriately scaled for the page size to maintain clarity․ These practices enhance the educational value of the worksheet․ Incorporating interactive elements into the Label the Skeleton Worksheet PDF enhances the learning experience by making it more engaging and dynamic․ Consider adding fillable fields where students can type labels directly onto the diagram․ Drag-and-drop features allow learners to match bones or joints to their correct positions, providing immediate feedback․ Include clickable hotspots that reveal the names of bones when hovered over or clicked․ Interactive quizzes or multiple-choice questions can test knowledge retention․ Animations, such as rotating 3D models, can help students visualize complex structures․ Use color-coding to highlight specific bone groups or joints․ Additionally, include progress trackers or checklists to monitor completion․ These interactive features cater to various learning styles and make anatomy education more accessible and enjoyable for students; Balancing interactivity with clarity ensures an effective learning tool․ The Label the Skeleton Worksheet PDF is a valuable tool for mastering the skeletal system, promoting confidence in anatomy and providing a clear path to understanding human bones effectively․ The Label the Skeleton Worksheet PDF is a highly effective tool for anatomy education, offering students an interactive way to engage with the human skeletal system․ By labeling bones and joints, learners develop a deeper understanding of their structure and function․ This worksheet fosters active learning, improving retention and recalling of complex anatomical details․ It also serves as a practical resource for reinforcing classroom lessons and preparing for exams․ The hands-on approach encourages curiosity and confidence, making it an invaluable asset for both students and educators․ Ultimately, the worksheet plays a crucial role in building a strong foundation in anatomy, which is essential for advancing in medical and scientific fields․ Its simplicity and clarity make it accessible to learners of all levels, ensuring effective and enjoyable learning experiences․ To maximize learning with the Label the Skeleton Worksheet PDF, start by reviewing the skeletal system basics․ Begin with major bones and gradually move to smaller, complex structures․ Use mnemonics or memory aids to remember bone names and locations․ Practice labeling repeatedly, as repetition reinforces retention․ After completing the worksheet, review your answers to identify and correct mistakes․ For deeper understanding, relate the bones to their functions in the body․ Incorporate flashcards or digital tools to supplement your learning․ Teach the material to someone else to test your knowledge․ Finally, stay consistent and patient with your study routine․ By combining these strategies, you’ll master the skeletal system efficiently and effectively․Key Joints and Their Functions

How to Label the Skeleton
Step-by-Step Guide to Labeling
Common Mistakes to Avoid

Benefits of Using a Worksheet
Improved Retention of Information

Enhanced Engagement with Anatomy

Best Practices for Creating a Skeleton Worksheet
Designing Clear and Visible Diagrams
Incorporating Interactive Elements
Summarizing the Importance of the Worksheet
Final Tips for Effective Learning
Leave a Reply